INSTALLATION TIPS
DISCLAIMER: The information contained in this document is subject to change without prior notice. Indy Penny Tile, LLC gives no guarantee of any kind whatsoever, either explicitly or implicitly, with respect to the information contained herein. Indy Penny Tile LLC does not make recommendations on glues/adhesives, grouts, sealers, maintenance or cleaning. Licensed and experienced tile installers should always be consulted.
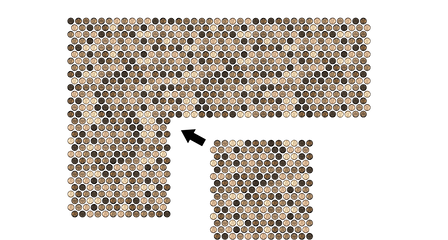
Interlocking penny sheets should be installed by aligning the grooves with the first sheet with the opposite grooves
of the next sheet. The sheets should be aligned with proper spacing to appear as if the pattern is continuous. This
pattern should be continued in a linear direction until a wall or obstacle is encountered. Proceed to the next row
by rotating the sheet 180 degrees from the previous sheet. Continue laying sheets by aligning the matching
grooves on the subsequent sheet. (see figure 2.0)
LAYING INTERLOCKING PENNY TILES


CUTTING INTERLOCKING PENNY TILES

Installation of interlocking penny sheets may require that the sheets be cut to fit properly. The mesh backing between the pennies can be cut easily with a utility blade on a flat surface (see figure 3.0). The actual pennies should NEVER be cut.
ADHESIVE
Thinset is commonly used to install penny tiles. Other adhesives may be used but it is recommended that the installer test prior to permanent installation. The adhesive must be spread thin enough that it does not come up between and above the pennies once the sheets are placed down. Use the small V shape trowel. As a general rule of thumb, the adhesive layer should be about as thick as a penny itself. When placing the sheets, It can be helpful to use a wooden roller to flatten the sheets and press the mesh backing all the way into the adhesive.
GROUT
Sanded grout is strongly recommended for all penny sheets. The gap between pennies varies and is too large at its widest point for unsanded grout. Apply grout in manageable amounts at a time. The installer should remove the excess grout with a sponge within 5 minutes. Wipe is circles and make sure to clean the sponge regularly, especially when using a dark color. Do NOT let the grout dry on the pennies, as it can be almost impossible to clean them once dried.
FINSIH
A sealant coat is strongly recommended for all penny installations. US Pennies are made of various metals and are susceptible to oxidation and tarnishing. Changes in color and patina will occur over time without the use of a sealant coat. Recommended finishes differ based on installation location and final use. When installing walkable surfaces, a two-part pourable epoxy will result in a very durable and clear surface if applied correctly. It is recommended that epoxy seal coats be installed licensed and experienced installers. Water-based polyurethane can also be used as an alternative but will not result in the same durability as an epoxy coat. Penny sheets applied to vertical surfaces (such as backsplashes) can be sealed with polyurethane. When sealing with polyurethane, apply multiple thin layers to build up a durable finish.
